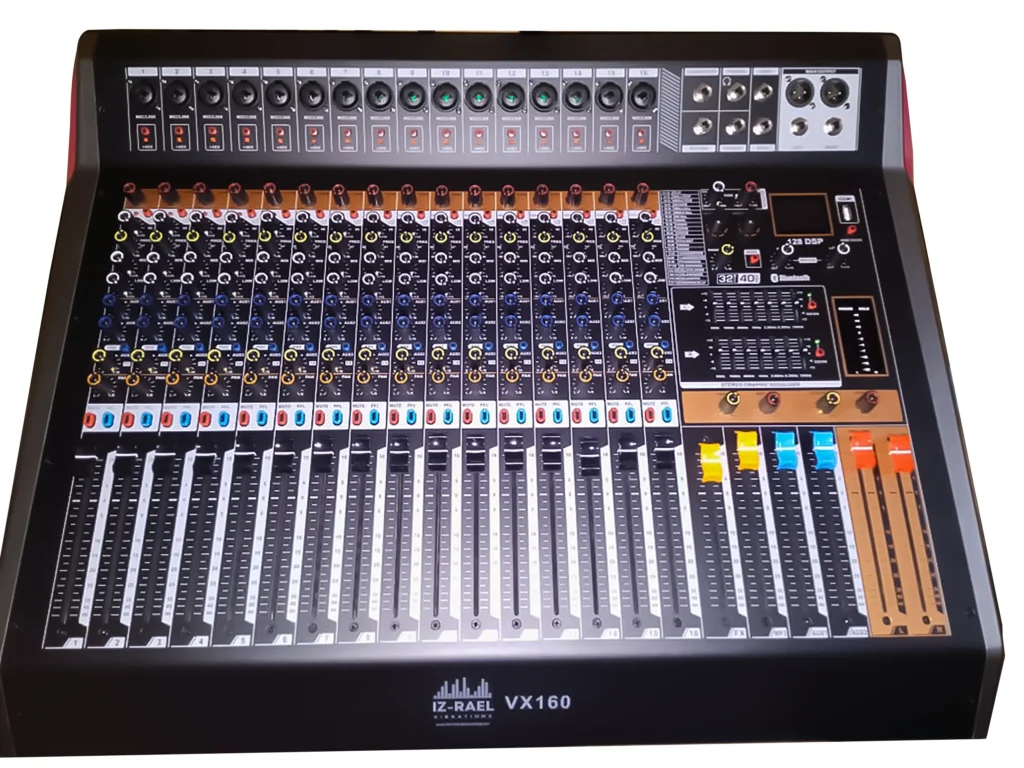
A powered mixer is one of the easiest ways to get professional sound for small events, churches, and mobile setups—because it combines two jobs in one box: mixing and amplifying.
In this guide, you’ll learn how to use a powered mixer step-by-step, based on the features explained in the tutorial (including the VX160 powered mixer workflow). You’ll also learn what each control is for—so you don’t just “turn knobs,” you actually build a clean, stable sound system.
1. What Is a Powered Mixer (and Why It’s Easier)
A powered mixer is called “powered” because it has an inbuilt power amplifier inside it.
That means:
you don’t need a separate power amplifier to drive your speakers,
you can connect microphones/instruments,
mix them,
and send the amplified output directly to speakers.
This reduces setup complexity and saves you money on extra equipment.
2. Powered Mixer vs Plain Mixer: What Changes for You
With a plain/non-powered mixer:
the mixer only mixes signals,
you must add an external amplifier to power speakers.
With a powered mixer:
the mixer mixes,
the built-in amp powers the speakers.
So your main job becomes:
correct input setup (mics/instruments),
correct gain/EQ,
correct aux/monitor routing,
and safe speaker connection.
3. Powered Mixer Features You Should Know
3.1 Inputs: XLR + Jack on each channel
On the powered mixer described, each channel supports XLR and Jack at the same time. That means you can plug in:
microphones (XLR),
keyboards/instruments (Jack/line),
and other audio sources without needing adapters.
3.2 Phantom power (+48V) per channel
The mixer provides phantom power (commonly +48V) for condenser microphones.
Important beginner rule:
Turn phantom power ON only for condenser mics that require it.
Turn it OFF for dynamic microphones that don’t need it.
Because phantom power is “more power into the mixer,” using it on the wrong mic can damage equipment.
3.3 Gain, low cut, and EQ (high/mid/low)
Each channel typically includes:
Gain: sets input level so your signal is strong but not clipping.
High / Mid / Low EQ: tone shaping for clarity and balance.
3.4 Frequency control (filtering focus)
The tutorial mentions a frequency control that lets you “add/increase that particular frequency” toward high or mid focus. Practically, this helps you:
emphasize clarity,
reduce muddiness,
and tune the sound to your room.
3.5 Aux outputs for monitors (1–3) and what they’re for
Auxiliary outputs are extra mixes you send to other destinations.
Common uses:
Stage monitors (so performers hear themselves)
Sending a signal to a separate amplifier for a specific purpose
Routing certain audio to a different output path
The mixer described has three aux outputs (Aux 1, Aux 2, Aux 3).
3.6 Left/Right stereo outputs
Left and right outputs give you stereo main sound. Even if your event is mostly mono (speech), stereo can still help with music playback and wider coverage.
3.7 MP3/Bluetooth/USB playback controls
If you connect a phone via Bluetooth or USB/MP3 input, you can control playback volume and effects from the mixer.
This is useful for:
backing tracks,
worship songs,
announcements,
and simple content playback.
3.8 Effects and effect programs
The mixer includes built-in effects such as:
ping-pong delay,
pitch effects,
and many effect programs (the tutorial mentions up to 128 effects).
Use effects lightly—too much delay/reverb can hide vocals.
3.9 Pre-EQ vs Post-EQ (how to choose)
The tutorial highlights pre and post equalization.
Pre-EQ: the aux/effect send is taken before EQ changes.
Post-EQ: the aux/effect send is taken after EQ changes.
Beginner tip:
If you want monitors to follow your EQ tone, use post-EQ.
If you want a separate “monitor tone” independent of EQ, use pre-EQ.
3.10 Subwoofer output
Some powered mixers include a subwoofer output so you can send low-end to a bass speaker system.
4. How to Use a Powered Mixer Step-by-Step
Step 1: Plan your setup
Decide what you’ll connect:
microphones (vocals/choir),
instruments (guitar/keyboard),
playback (phone/USB/Bluetooth),
speakers (tops and possibly sub).
Step 2: Connect microphones and instruments
Plug mics into XLR inputs.
Plug instruments/line sources into Jack/line inputs.
Keep cables secure to avoid noise.
Step 3: Turn on phantom power only when needed
If you use condenser microphones, enable +48V on those channels.
If you use dynamic microphones, keep phantom power OFF.
Step 4: Set gain and low cut for clean sound
Start with gain low.
Turn up slowly until the channel sounds clear.
Use low cut to reduce rumble and stage noise.
Step 5: EQ for clarity (high/mid/low + frequency control)
If vocals sound dull: increase high/high-mid slightly.
If vocals sound harsh: reduce high slightly.
If sound is muddy: reduce low or mid slightly and use low cut.
Step 6: Build monitor mixes using aux sends
For each performer:
adjust Aux 1/2/3 levels so they can hear themselves,
keep monitor volume as low as possible to avoid feedback.
Step 7: Set stereo main output levels
Adjust left/right main output so the audience hears a balanced mix.
Avoid pushing too hard—powered mixers can distort if overloaded.
Step 8: Add effects without ruining vocals
Start with a small effect amount.
If vocals become unclear, reduce effects.
Step 9: Test with a short sound check
Do a 30–60 second test:
speak/sing,
play a backing track,
check monitors,
then start your event.
5. Speaker Power and Channel Matching (Beginner Safety)
The tutorial explains that the powered mixer can serve speakers confidently within a safe wattage range.
Beginner-safe approach:
Use speakers that match the mixer’s intended power range.
Don’t assume “bigger wattage” always means better.
If you’re unsure, start with moderate speakers (for example, 500–1000W class tops in the tutorial’s advice) and scale carefully.
Also remember: distortion and overheating happen when you push beyond safe limits.
6. Common Mistakes to Avoid
Turning phantom power on for dynamic mics.
Setting gain too high before EQ.
Using too much delay/reverb on vocals.
Setting monitor volume too high (feedback risk).
Ignoring low cut on noisy channels.
Connecting speakers incorrectly or exceeding safe power.
A powered mixer is a practical way to get clean sound without extra amplifiers. If you understand the basics—inputs, phantom power, gain, low cut, EQ, aux monitors, effects, and safe speaker power—you’ll set up faster and sound better immediately.